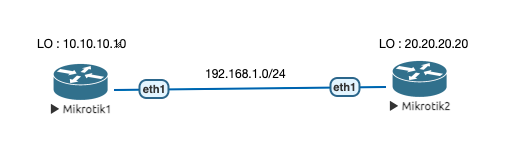
In this tutorial I’ll discuss about how to configuration ospf routing protocol in mikrotik. and for this lab I’ll use routeros version 6.x. Here’s the topologi for this lab :
R1 IP Configuration :
[admin@MikroTik] > system identity set name=R1
[admin@R1] > ip address add address=192.168.1.1/24 interface=ether1
[admin@R1] > interface bridge add name=LO
[admin@R1] > ip address add address=10.10.10.10/32 interface=LO
R2 IP Configuration :
[admin@MikroTik] > system identity set name=R2
[admin@R2] > ip address add address=192.168.1.2/24 interface=ether1
[admin@R2] > interface bridge add name=LO
[admin@R2] > ip address add address=20.20.20.20 interface=LO
OSPF Configuration on R1 :
Setup RouterID and distribute network that will advertise to ospf network.
[admin@R1] > routing ospf instance set default router-id=10.10.10.10
[admin@R1] > routing ospf network add network=192.168.1.0/24 area=backbone
[admin@R1] > routing ospf network add network=10.10.10.10 area=backbone
OSPF Configuration on R2 :
[admin@R2] > routing ospf instance set default router-id=20.20.20.20
[admin@R2] > routing ospf network add network=192.168.1.0/24 area=backbone
[admin@R2] > routing ospf network add network=20.20.20.20 area=backbone
Checking ospf neighbors state and routing table on R1 and R2 :
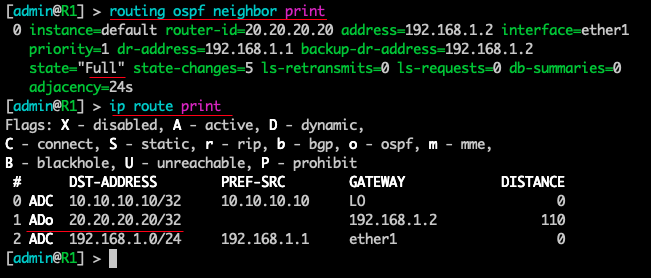
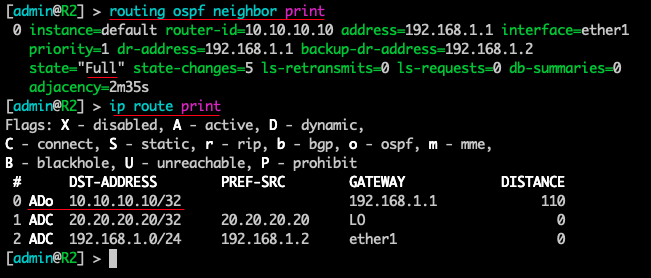
as shown above you can see that the ospf routing protocol already running on R1 and R2 and every router has got routing protocol infromation. marker by ADo flag (Active Dynamic Ospf).
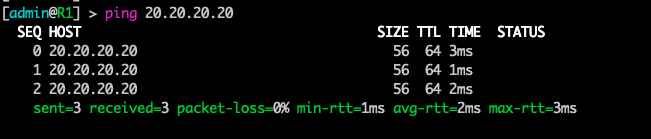
and then test connection between network on R1 to R2 :