When you configure ospf route, every router certainly create the routerID (RID) for each the routers. The router id using for unique identity number in ospf network. ospf router id using 32bit number format like ip address. The selection of router id is doing manually if you configure router id in ospf configuration. but if you’re not configure router id, the router will be select router id as automatically.
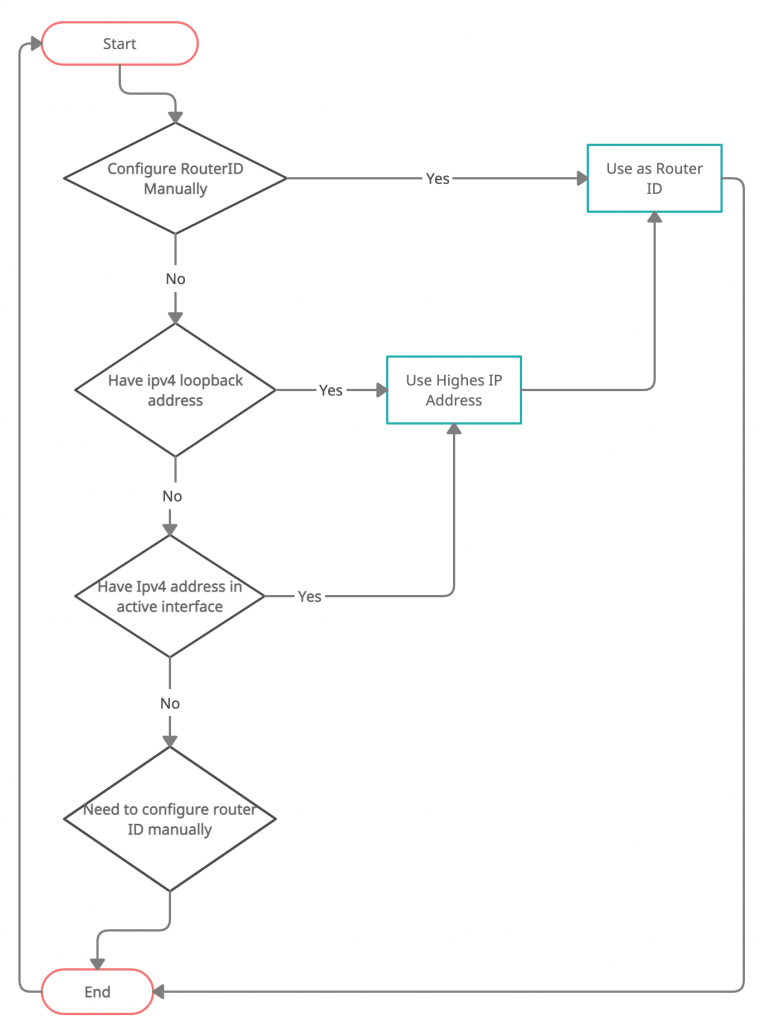
The following is selecting process of router id.
The following are topologi which used for this tutorials :
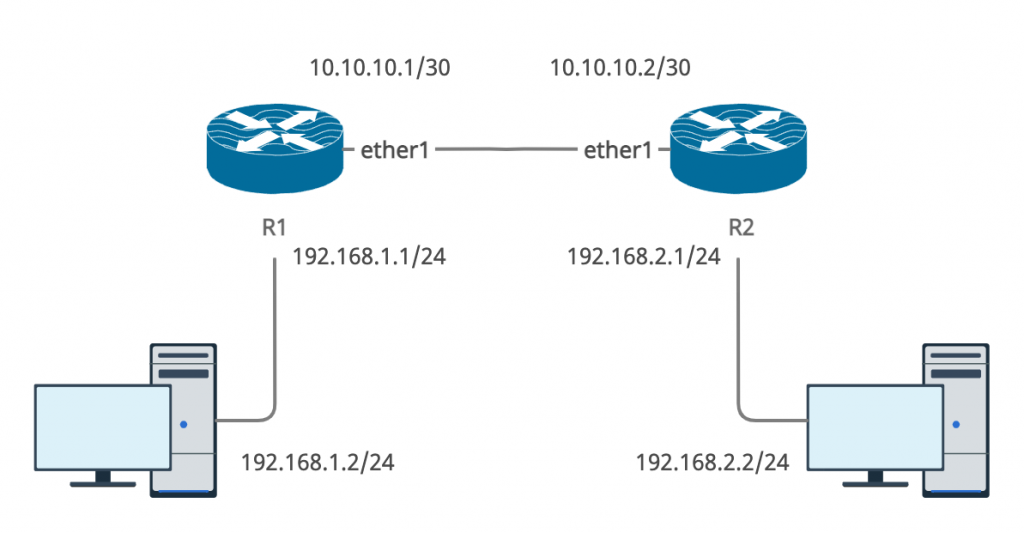
First you must configure ip address in each router
R1 :
[admin@R1] > ip address add address=10.10.10.1/30 interface=ether1
[admin@R1] > ip address add address=192.168.1.1/24 interface=ether2
Show ip address list :
[admin@R1] > ip address print
Flags: X – disabled, I – invalid, D – dynamic
# ADDRESS NETWORK INTERFACE
0 10.10.10.1/30 10.10.10.0 ether1
1 192.168.1.1/24 192.168.1.0 ether2
R2 :
[admin@R2] > ip address add address=10.10.10.2/30 interface=ether1
[admin@R2] > ip address add address=192.168.2.1/24 interface=ether2
Show ip address list :
[admin@R2] > ip address pr
Flags: X – disabled, I – invalid, D – dynamic
# ADDRESS NETWORK INTERFACE
0 10.10.10.2/30 10.10.10.0 ether1
1 192.168.2.1/24 192.168.2.0 ether2
Then add new interface bridge named loopback and add new ip address for those interface on the both router.
R1 :
[admin@R1] > interface bridge add name=loopback
[admin@R1] > ip address add address=1.1.1.1 interface=loopback
R2 :
[admin@R2] > interface bridge add name=loopback
[admin@R2] > ip address add address=2.2.2.2 interface=loopback
Don’t forget to configure ip address in both pc which are connected in R1 and R2. then configure ospf routing for R1 and R2
Configure OSPF Network in R1 :
[admin@R1] > routing ospf network add network=10.10.10.0/30 area=backbone
[admin@R1] > routing ospf network add network=192.168.1.0/24 area=backbone
[admin@R1] > routing ospf network add network=1.1.1.1 area=backbone
Show Configure ospf network
[admin@R1] > routing ospf network print
Flags: X – disabled, I – invalid
# NETWORK AREA
0 10.10.10.0/30 backbone
1 192.168.1.0/24 backbone
2 1.1.1.1/32 backbone
Configure OSPF Network in R2 :
[admin@R2] > routing ospf network add network=10.10.10.0/30 area=backbone
[admin@R2] > routing ospf network add network=192.168.2.0/24 area=backbone
[admin@R2] > routing ospf network add network=2.2.2.2 area=backbone
Show Configure ospf network
[admin@R2] > routing ospf network print
Flags: X – disabled, I – invalid
# NETWORK AREA
0 10.10.10.0/30 backbone
1 192.168.2.0/24 backbone
2 2.2.2.2/32 backbone
Show ospf neighbor status on R1 and R2


As shown image above in R1 and R2 you can seing the routing status for the router who activate routing protocol OSPF. you can see router-id use the loopback ipv4 address on both router because we not manually configure router-id.
Now we’ll try to manually configure routerid in R1 and R2 :
R1 :
[admin@R1] > routing ospf instance set default router-id=10.1.1.1
R2 :
[admin@R2] > routing ospf instance set default router-id=10.2.2.2
Then do rebooted for both routers. after reboot check again ospf neighbor.


You can see the router-id in R1 and R2 has changes with new router-id that are manually configuration.